
The Ultimate Garage Door Spring Repair Checklist for Homeowners

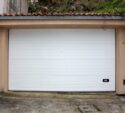
Parker, CO homeowners can catch most garage door spring problems early with a simple monthly inspection and a few seasonal maintenance steps. This checklist separates what you can safely do yourself from what requires a trained technician. Select Garage Doors provides spring inspection and repair across Parker and the Denver metro area.
Contents
- Your Garage Door Spring Repair Checklist
- When to Call for Spring Repair in Parker
- Stay Ahead of Spring Failures in Parker
- Frequently Asked Questions
Garage door springs carry the full weight of your door through thousands of opening and closing cycles. When they weaken or fail, the door becomes a safety hazard and a major inconvenience. The good news for Parker, CO homeowners is that most spring problems give warning signs well before a full failure, and a short monthly inspection is enough to catch them. Select Garage Doors recommends this checklist to help you stay ahead of spring issues and know exactly when to call for service.
This checklist separates what you can safely handle at home from what requires a trained technician with the right tools and experience.
Your Garage Door Spring Repair Checklist
1. How Do I Visually Inspect My Garage Door Springs?
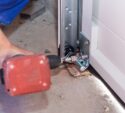
With the door in the closed position, stand inside the garage and look at the springs mounted on the horizontal shaft above the door opening. You are looking for gaps between coils, visible rust, elongation (stretched-out appearance), or any deformation in the coil shape. Do not touch the springs. Visual inspection only.
A healthy torsion spring has tightly wound, uniform coils with no visible gaps. If you see a separation between any of the coils, that is a sign the spring has partially failed or is very close to breaking. Rust is a concern because it weakens the steel and increases friction, which accelerates wear with every cycle.
Parker’s dry winters followed by wet spring months create a rust-friendly environment for unprotected steel. If your springs show surface rust, they may still be functional, but they are aging faster than they should be. Lubrication addresses this directly.
Perform this visual check once a month. It takes less than a minute and can save you from an unexpected failure.
2. How Should I Lubricate Garage Door Springs?
Apply a silicone-based spray or white lithium grease directly to the spring coils twice a year. Avoid standard WD-40, which is a solvent and not a long-term lubricant. Coat the entire length of each spring with a light, even application. While you are at it, lubricate the hinges, rollers, and bearing plates on the same schedule.
Lubrication reduces friction between the coils as the spring winds and unwinds, which directly extends the spring’s cycle life. It also displaces moisture and creates a barrier against the rust that Parker’s temperature cycling promotes on bare metal.
The best time to lubricate is in early fall before the first hard freeze and again in spring after the thaw. These two applications cover the seasons that put the most stress on spring steel in the Denver metro area. For homeowners who want a deeper understanding of how lubrication fits into the bigger maintenance picture, comprehensive maintenance beyond lubrication covers the full scope of what keeps a garage door system healthy.
3. How Do I Test My Garage Door’s Balance?
Disconnect the opener by pulling the emergency release cord (the red handle hanging from the track). Lift the door manually to the halfway point and let go. A properly balanced door stays in place. If it falls, the springs are too weak. If it rises, the springs have too much tension. Either result means the springs need adjustment.
This test tells you whether the springs are still counterbalancing the door’s weight correctly. Over time, springs lose tension as the metal fatigues. A door that slowly drifts down from the halfway point is showing early signs of spring fatigue, even if it still opens and closes normally with the opener running.
Run this balance test every three months. It is the single most reliable indicator of spring health that you can check without any tools or expertise. If the door fails the balance test, do not attempt to adjust the springs yourself. Spring tension adjustment requires specialized winding bars and training.
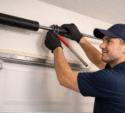
4. What Hardware Should I Check Around the Springs?
Inspect the brackets that anchor the spring assembly to the wall above the door, the center bearing plate, and the cable drums at each end of the torsion shaft. Look for loose bolts, cracked brackets, or cables that appear frayed or slack. Tighten any loose bolts with a socket wrench, but do not touch the spring winding cone or the set screws on the cable drums.
Loose hardware causes uneven stress distribution across the spring system. A bracket that has worked loose allows the torsion shaft to shift, which changes the cable tension and can cause the door to track unevenly. Over months, this misalignment accelerates wear on the springs, rollers, and track.
Pay attention to the bottom brackets where the lift cables attach to the door. These are under extreme tension and should never be removed or adjusted by a homeowner. If a bottom bracket appears damaged or the cable is slack, that is a call for a technician.
5. How Do I Know When Springs Need Replacement vs. Adjustment?
Springs need replacement if you see a visible gap or break in the coil, if the door fails the balance test significantly (drops or rises quickly), or if the springs are past their rated cycle life. Springs need adjustment if the door drifts slowly from the halfway point or opens and closes unevenly. Only a technician should make either repair.
| What You Observe | Likely Cause | Action |
|---|---|---|
| Gap in spring coils | Spring has broken | Call for replacement immediately |
| Door drops from halfway point | Springs losing tension | Schedule adjustment or replacement |
| Loud squeaking during operation | Lack of lubrication or worn bearings | Lubricate; if noise persists, call for service |
| Door opens unevenly (one side higher) | Uneven spring tension or cable issue | Call for inspection |
| Visible rust on coils | Corrosion from moisture exposure | Lubricate now; monitor closely |
The key distinction: lubrication and visual inspection are safe for homeowners. Anything involving tension adjustment, spring replacement, or cable work is not. The most common spring repair questions cover the specifics of what to expect when you do need to call for service.
When to Call for Spring Repair in Parker
Use this checklist monthly and you will catch most problems before they become emergencies. But when any of the following are true, stop using the door and contact a Parker garage door spring repair technician:
- You heard a loud bang from the garage (spring has snapped)
- The door will not open or is stuck in the closed position
- The door slammed shut unexpectedly
- Cables appear frayed, loose, or have jumped off the drum
- The door is visibly crooked or off-track
These situations involve components under high tension. Attempting a DIY repair on a torsion spring system risks serious injury. A qualified technician can complete most spring replacements in under an hour during a scheduled visit.
Stay Ahead of Spring Failures in Parker
Parker homeowners who follow this checklist catch spring problems early, avoid emergency repair costs, and keep their garage door safe through Colorado’s demanding climate. A few minutes of inspection each month goes a long way.
Select Garage Doors provides spring inspection, adjustment, and replacement for homeowners across Parker and the Denver metro. We serve Parker, Castle Rock, Greenwood Village, Lakewood, and the greater Denver metro area.
To schedule a spring inspection or ask about your door’s condition, call 720-339-2442 or book a service visit online.
Frequently Asked Questions
How often should I inspect my garage door springs?
Monthly for visual inspection. Run the balance test every three months. Lubricate twice a year, ideally before winter and after the spring thaw.
Can I replace garage door springs myself?
No. Torsion springs are under extreme tension and require specialized winding bars and training to replace safely. Incorrect handling can cause serious injury or death.
How long does a spring repair visit take?
A straightforward spring replacement typically takes 45 minutes to an hour. If additional components need attention, the technician will let you know before proceeding.
Should I replace both springs even if only one broke?
Yes. Both springs were installed at the same time and have the same cycle wear. If one has failed, the other is close behind. Replacing both avoids a second failure and a second service call.


Service Area: 50+ Cities Across Metro Denver
Select Your Nearest Location
Hours: Mon-Fri 8am-5pm
Sunday Emergency Only
Avg Response Time: 18 minutes
Hours: Mon-Fri 8am-5pm
Sunday Emergency Only
Avg Response Time: 18 minutes
Hours: Mon-Fri 8am-5pm
Sunday Emergency Only
Avg Response Time: 18 minutes
Hours: Mon-Fri 8am-5pm
Sunday Emergency Only
Avg Response Time: 18 minutes
Hours: Mon-Fri 8am-5pm
Sunday Emergency Only
Avg Response Time: 18 minutes
Hours: Mon-Fri 8am-5pm
Sunday Emergency Only
Avg Response Time: 18 minutes
Hours: Mon-Fri 8am-5pm
Sunday Emergency Only
Avg Response Time: 18 minutes
Hours: Mon-Fri 8am-5pm
Sunday Emergency Only
Avg Response Time: 18 minutes
Hours: Mon-Fri 8am-5pm
Sunday Emergency Only
Avg Response Time: 18 minutes
Hours: Mon-Fri 8am-5pm
Sunday Emergency Only
Avg Response Time: 18 minutes
Hours: Mon-Fri 8am-5pm
Sunday Emergency Only
Avg Response Time: 18 minutes
Hours: Mon-Fri 8am-5pm
Sunday Emergency Only
Avg Response Time: 18 minutes
Hours: Mon-Fri 8am-5pm
Sunday Emergency Only
Avg Response Time: 18 minutes
Hours: Mon-Fri 8am-5pm
Sunday Emergency Only
Avg Response Time: 18 minutes
Hours: Mon-Fri 8am-5pm
Sunday Emergency Only
Avg Response Time: 18 minutes
We Service: Parker, Castle Rock, Greenwood Village, Lakewood, Littleton, Centennial, Highlands Ranch 40+ More Cities